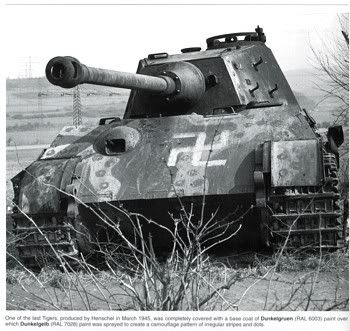
I needed a paint fix on Saturday night to keep the AMS away during my BR52 build, so I got some already started stuff that was hanging around and formed some ideas around a interesting dio with a final Tiger picked up by 510 direct from the Henschel factory - March 29 1945. There is still debate over the cam scheme on these tanks as the red brown and olive green are hard to pick in B+W. One thing that is certain was the order issued in late november 1944 for armour components to be painted in dark green as a factory base coat with red brown and yellow to be sprayed over this. This was meant to come into effect on 1st March 1945. I have seen only two photos of one of these tanks near Kassel - knocked out. It sports a base coat with lighter cammo and irregularly shaped circles on the lighter color.
..................
..

Photos of newly finished turrets waiting outside the Henschel factory seem to be in single color base coat.
I thought it would be fun to explore the possibilities here......... orders were often put on hold or intergrated as retro fitted parts were run out and new ones then used. I felt a nice paint job, and one that would be a bit topical, would be a Tiger 2 produced during this period from a damged one . One of the KTigers picked up by 510 could well have been a fix up, with new paint etc. I also doubt weather all these tanks were painted the same with the circular marks and dark yellow - the paint job looks very rushed, almost like the unit had applied the lighter color.
I have gone with this idea, creating a late model Tiger 2 with a new, as yet unpainted, Red Primer turret, fitted to a used chassis that has been 'fixed -up' with a hastey overspray of green over the new solid red primer base applied earlier to the chassis when it first came in for repair - this would have made it an jan/Feb build chassis which matches my mods. The turret has just been grabbed off the line outside the factory and put on the chassis to get it out the door [without applying the green basecoat].
My dio is set a couple of months later, the paint has been damaged and is already comming off the chassis through battle damage and weathering by May '45. It now lies knocked out and bleeding silently, as the final skirmishes come to a halt accross Germany..[I CAN CRAP -ON CAN'T I

].
I started with a COMPLETED TAMIYA King Tiger that needed paint but already had the detailing done for a Jan/Feb issue tank [Aber brass, VP resin engine bay and all the scratch mods done]. This tank has some slight shelf damage so I thought it would be ideal for this project as some of the tank will be covered with debri - good for hiding missing and broken parts. This will need a little work but would allow me to get away from the detailing for a while.....
..

..

I base coated it with Tamiya black then gave it a ruff , light overspray with Tamiya RED Brown. Please excuse the photo's here as the lights were too bright and took out my color and contrast to a certain extent.
I next added a more definate coat of Pollyscale Panzer RED Brown - but still patchy.
.....................

I had to remove the wheels for re-painting as well as to fit on the dio base. These had to be broken - off because they had been glued earlier. They will be OK as there will be a lot of debri covering a lot of the bits and pieces as it is gong to be sitting next to a building.
...

.....

I made some of the sections of the hull more intense in color so that they would look as though they had been replaced/ retro fitted............. I made these red brown as though they would have come from earlier stock that had not beeen used yet.

.......

Next I added the maskol to cover the red brown areas I wanted left sharp then oversprayed with Tamiya black green. I applied this coat in an uneven way to simulate a hastily done dark background base.

.
..........................

The Primer look has nicely offset the green and has come out just how I wanted.
........

Next up was the ghost coat with Testors Panzer Olive green to give it that worn and faided start to the detailing stage.
..

................................

.................................

........

....................................

..........................

Next up the detailing and the base............. see ya then.


 plastic Nymphomaniac
")


 Threaded Mode
